Translator’s note: This is the 5th article of the series “Cloud Foundry 100-day Challenge selection”. “#017” in the title means that it is 17th (published on June 26, 2015) in the original Japanese series.
Original Author: Kiyohide NAGAI
The 17th topic of “Cloud Foundry 100-Day Challenge” is SQL Buddy.
This is a PHP application that enables to administer MySQL from a Web browser.
We have used MySQL of cf-mysql-release several times with other applications introduced in this series. It can be convenient if you can see the content of the database when, for example, you need to create a table or enter initial data into MySQL. This application will allow you to proceed with your task while viewing the content of the database.
Basic Information
- Official site
http://sqlbuddy.com/ - Source code
Downloadable from the official site - Reference
http://pentan.info/sql/mysql/sqlbuddy.html (translator’s note: in Japanese)
Deployment
Procedures
- 0) Preparation
- 1) Starting up the Application
- 2) Checking Application Behavior
0. Preparation
First, we need to retrieve the source code. We will download the version that is made available, as it seems that we cannot specify a version to download.
The version available at the time of this post (translator’s note: Jun 26, 2015) is 1.3.3 (Jan 18, 2011).
$ wget https://github.com/calvinlough/sqlbuddy/raw/gh-pages/sqlbuddy.zip
$ unzip sqlbuddy.zip
$ cd sqlbuddy
sqlbuddy$ ls
ajaxcreatetable.php  ajaxsavecolumnedit.php  config.php      edit.php	   functions.php  includes    LICENSE	  query.php	 themes
ajaxfulltext.php     ajaxsaveedit.php	     css	     edituser.php  home.php	  index.php   locale	  README	 users.php
ajaximportfile.php   ajaxsaveuseredit.php    dboverview.php  export.php    images	  insert.php  login.php   serve.php
ajaxquery.php	     browse.php		     editcolumn.php  exports	   import.php	  js	      logout.php  structure.php
1. Starting up the Application
As was the case with 100-day Challenge #010 (tranlator’s note: in Japanese), before running cf push, we will first create a directory for buildpack configurations and a configuration file for php-buildpack so that the MySQL module can be read in.
sqlbuddy$ mkdir .bp-config/
sqlbuddy$ vi .bp-config/options.json
{
    "PHP_EXTENSIONS": ["mysql"]
}
With this, the preparation is complete.
We will cf push the application with the --no-start option, and as was the case previously, we will let it run up to the point in which we can use cf env to check the MySQL database connection information created with cf-mysql-release
sqlbuddy$ cf push sqlbuddy -b https://github.com/cloudfoundry/php-buildpack.git --no-start
sqlbuddy$ cf create-service p-mysql 100mb-dev app1-db
sqlbuddy$ cf bind-service sqlbuddy app1-db
sqlbuddy$ cf env sqlbuddy
Getting env variables for app sqlbuddy in org k-nagai / space work as k-nagai...
OK

System-Provided:
{
 "VCAP_SERVICES": {
  "p-mysql": [
   {
    "credentials": {
     "hostname": "10.244.1.18",
     "jdbcUrl": "jdbc:mysql://10.244.1.18:3306/cf_e5edadbd_37d9_4427_8b43_242df820e262?user=4LqkSI6cUfnzRjvf\u0026password=1PuiNgg1J02ITGhP",
     "name": "cf_e5edadbd_37d9_4427_8b43_242df820e262",
     "password": "1PuiNgg1J02ITGhP",
     "port": 3306,
     "uri": "mysql://4LqkSI6cUfnzRjvf:[email protected]:3306/cf_e5edadbd_37d9_4427_8b43_242df820e262?reconnect=true",
     "username": "4LqkSI6cUfnzRjvf"
    },
    "label": "p-mysql",
    "name": "app1-db",
    "plan": "100mb-dev",
    "tags": [
     "mysql"
    ]
   }
  ]
 }
}
Next, we will start up the application.
sqlbuddy$ cf start sqlbuddy
:
OK

requested state: started
instances: 1/1
usage: 256M x 1 instances
urls: sqlbuddy.10.244.0.34.xip.io
last uploaded: Tue Jun 23 07:38:27 +0000 2015
stack: lucid64

     state     since                    cpu    memory          disk      details
#0   running   2015-06-23 04:39:15 PM   0.0%   23.2M of 256M   0 of 1G
The deployment has been completed.
2. Checking the Application Behavior
Now let us access it through a browser.
We get a login screen, so we will enter connection information that we have obtained via cf env.
In this case, we will enter “hostname”, “username”, and “password” in order from top to bottom.

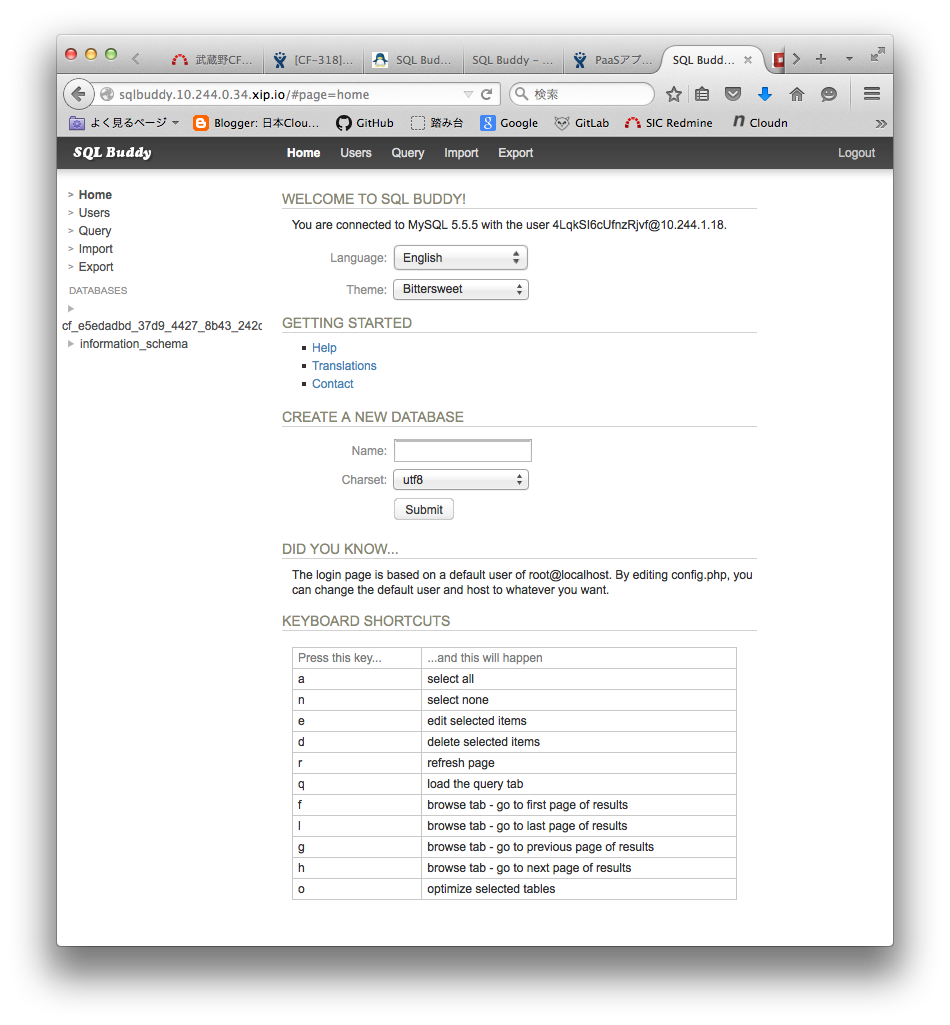
The below image is what you get when you log in, so go ahead and choose a language.

To operate the database, choose a database name from the ‘DATABASES’ tree on the left.

After that, we proceed to tasks such as entering SQL commands with Query from the menu up top, importing SQL files, or creating tables with a GUI.
It should be noted that the MySQL which is provided by cf-mysql-release does not allow you to perform all operations; you may use it for simpler tasks such as creating tables or entering / viewing data.
Extras
With the SQL Buddy application on Cloud Foundry, the assumption is that it is used for initial settings or checking data when using MqSQL of cf-mysql-release for other applications, rather than using it standalone.
As such, it should be a rare case to create a MySQL database for SQL Buddy itself like we did in this post. It is more common to log in a MySQL database that is bound for other applications.
It can even be said that one can log in without binding SQL Buddy with MySQL service, if one know the connection information between a MySQL service and another application.
However, if you are uncomfortable with handling database connection information with a Web browser, there is an alternative method.
First, edit login.php as follows:
sqlbuddy$ cp login.php login.php.org
sqlbuddy$ vi login.php
sqlbuddy$ diff login.php.org login.php
18a19
> /*
22c23,29
<
---
> */
> $services = getenv("VCAP_SERVICES");
> $services_json = json_decode($services,true);
> $mysql_config = $services_json["p-mysql"][0]["credentials"];
> $host = $mysql_config["hostname"];
> $user = $mysql_config["username"];
> $pass = $mysql_config["password"];
This modification is commenting out the codes where the original ‘login information’ is obtained, and replacing it with codes that obtains connection infromation from VCAP_SERVICES.
Then cf push the modified SQL Buddy, bind to the MySQL service you wish to access, and cf start, with the steps described earlier.
This way, you are already logged in to the intended database when we access the application with your Web browser.
The database access can be cut off by unbinding, if you don’t need to work with the MySQL service anymore.
If you wish to work with databases of other MySQL services, you merely need to bind the application to the intended MySQL service and cf restage.
The Environment Used in this Post
- cf-release (v194)
https://github.com/cloudfoundry/cf-release/tree/v194
( https://github.com/cloudfoundry/cf-release/tree/345a8b3e1ea0005a3e9fced13f0bf6fa6f7ad981 ) - bosh-lite
https://github.com/cloudfoundry/bosh-lite/tree/01db9da7b4122f7d02858d92e0fe938e91256649 - CF CLI (v6.11.3-cebadc9-2015-05-20T19:00:58+00:00)
https://github.com/cloudfoundry/cli/releases/tag/v6.11.3 - cf-mysql-release (v16)
https://github.com/cloudfoundry/cf-mysql-release/tree/v16
(https://github.com/cloudfoundry/cf-mysql-release/tree/63f0bc3914914ce469c80df07c9fa49c5b836f11) - php-buildpack
https://github.com/cloudfoundry/php-buildpack/tree/6c5d638e7800938e8b086900548cb36a81c752b0 - sqlbuddy (1.3.3)
http://sqlbuddy.com/


