
In the previous blog Scaling Real-time Apps on Cloud Foundry Using Node.js and Redis, we used Redis as a ‘session store’ and also as a ‘pub-sub’ service for chat messages. But in many enterprise grade real-time apps, you may want to use RabbitMQ instead of Redis to do pub-sub because of the reliability and features that comes out-of-the-box in RabbitMQ. This is especially true for financial or Bank apps like Stock Quote apps where it is critical to protect and deliver each-and-every message AND do it as quickly as possible.
So, in this blog, we will start from Scaling Real-time Apps on Cloud Foundry Using Node.js and Redis and simply replace Redis with RabbitMQ pubsub.
The app architecture (before):

The app architecture w/ RabbitMQ (after):

Introduction to RabbitMQ
The Node.js community may not be familiar with RabbitMQ. So here are some of the high-level intro of RabbitMQ.
RabbitMQ is a message broker. It simply accepts messages from one or more endpoints “Producers” and sends it to one or more endpoints “Consumers”.
RabbitMQ is more sophisticated and flexible than just that. Depending on the configuration, it can also figure out what needs to be done when a consumer crashes(store and re-deliver message), when consumer is slow (queue messages), when there are multiple consumers (distribute work load), or even when RabbitMQ itself crashes (durable). For more please see: RabbitMQ tutorials.
RabbitMQ is also very fast & efficient. It implements Advanced Message Queuing Protocol “AMQP” that was built by and for Wall Street firms like J.P. Morgan Chase, Goldman Sachs, etc. for trading stocks and related activities. RabbitMQ is an Erlang (also well-known for concurrency & speed) implementation of that protocol.

For more please go through RabbitMQ’s website.
Fundamental pieces of RabbitMQ
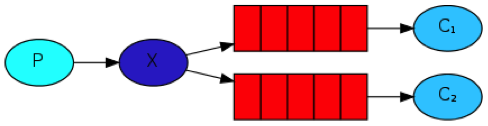
RabbitMQ has 4 pieces.
- Producer (“P”) – Sends messages to an exchange along with “Routing key” indicating how to route the message.
- Exchange (“X”) – Receives message and Routing key from Producers and figures out what to do with the message.
- Queues(“Q”) – A temporary place where the messages are stored based on Queue’s “binding key” until a consumer is ready to receive the message. Note: While a Queue physically resides inside RabbitMQ, a consumer (“C”) is the one that actually creates it by providing a “Binding Key”.
- Consumer(“C”) – Subscribes to a Queue to receive messages.
Routing Key, Binding Key and types of Exchanges
To allow various work-flows like pub-sub, work queues, topics, RPC etc., RabbitMQ allows us to independently configure the type of the Exchange, Routing Key and Binding Key.
Routing Key:
A string/constraint from Producer instructing Exchange how to route the message. A Routing key looks like: “logs”, “errors.logs”, “warnings.logs” “tweets” etc.
Binding Key:
Another string/constraint added by a Consumer to a queue to which it is binding/listening to. A Binding key looks like: “logs”, “*.logs”, “#.logs” etc.
Note: In RabbitMQ, Binding keys can have “patterns” (but not Routing keys).
Types of Exchange:
Exchanges can be of 4 types:
- Direct – Sends messages from producer to consumer if Routing Key and Binding key match exactly.
- Fanout – Sends any message from a producer to ALL consumers (i.e ignores both routing key & binding key)
- Topic – Sends a message from producer to consumer based on pattern-matching.
- Headers – If more complicated routing is required beyond simple Routing key string, you can use headers exchange.
In RabbitMQ the combination of the type of Exchange, Routing Key and Binding Key make it behave completely differently. For example: A fanout Exchange ignores Routing Key and Binding Key and sends messages to all queues. A Topic Exchange sends a copy of a message to zero, one or more consumers based on RabbitMQ patterns (#, *).
Going into more details is beyond the scope of this blog, but here is another good blog that goes into more details: AMQP 0-9-1 Model Explained
Using RabbitMQ to do pub-sub in our Node.js chat app.
Now that we know some of the basics of RabbitMQ, and all the 4 pieces, let’s see how to actually use it in our Chat app.
Chat App:

Connecting to RabbitMQ and creating an Exchange
For our chat application, we will create a fanout exchange called chatExchange. And we will be using node-amqp module to talk to RabbitMQ service.
//Connect to RabbitMQ and get reference to the connection.
var rabbitConn = amqp.createConnection({});

//Create an exchange with a name 'chatExchange' and of type 'fanout'
var chatExchange;
rabbitConn.on('ready', function () {
    chatExchange = rabbitConn.exchange('chatExchange', {'type': 'fanout'});
});
Creating Producers (So Users can send chat messages)
In our chat app, users are both producers(i.e. sends chat messages to others) and also consumers (i.e. receives messages from others). Let’s focus on users being ‘producers’.
When a user sends a chat message, publish it to chatExchange w/o a Routing Key (Routing Key doesn’t matter because chatExchange is a ‘fanout’).
/**
     * When a user sends a chat message, publish it to chatExchange w/o a Routing Key (Routing Key doesn't matter
     * because chatExchange is a 'fanout').
     *
     * Notice that we are getting user's name from session.
     */
    socket.on('chat', function (data) {
        var msg = JSON.parse(data);
        var reply = {action: 'message', user: session.user, msg: msg.msg };
        chatExchange.publish('', reply);
    });
Similarly, when a user joins, publish it to chatExchange w/o Routing key.
/**
     * When a user joins, publish it to chatExchange w/o Routing key (Routing doesn't matter
     * because chatExchange is a 'fanout').
     *
     * Note: that we are getting user's name from session.
     */
    socket.on('join', function () {
        var reply = {action: 'control', user: session.user, msg: ' joined the channel' };
        chatExchange.publish('', reply);
    });
Creating Consumers (So Users can receive chat messages)
Creating consumers involves 3 steps:
- Create a queue with some options.
- Bind queue to exchange using some “Binding Key”
- Create a subscriber (usually a callback function) to actually obtain messages sent to the queue.
For our chat app,
- Let’s create a queue w/o any name. This forces RabbitMQ to create new queue for every socket.io connection w/ a new random queue name. Let’s also set
exclusiveflag to ensure only this consumer can access the messages from this queue.
rabbitConn.queue('', {exclusive: true}, function (q) {
 ..
 }
- Then bind the queue to chatExchange with an empty ‘Binding key’ and listen to ALL messages.
q.bind('chatExchange', "");
- Lastly, create a consumer (via q.subscribe) that waits for messages from RabbitMQ. And when a message comes, send it to the browser.
q.subscribe(function (message) {
   //When a message comes, send it back to browser
   socket.emit('chat', JSON.stringify(message));
 });
Putting it all together.
sessionSockets.on('connection', function (err, socket, session) {
    /**
     * When a user sends a chat message, publish it to chatExchange w/o a Routing Key (Routing Key doesn't matter
     * because chatExchange is a 'fanout').
     *
     * Notice that we are getting user's name from session.
     */
    socket.on('chat', function (data) {
        var msg = JSON.parse(data);
        var reply = {action: 'message', user: session.user, msg: msg.msg };
        chatExchange.publish('', reply);
    });

   /**
     * When a user joins, publish it to chatExchange w/o Routing key (Routing doesn't matter
     * because chatExchange is a 'fanout').
     *
     * Note: that we are getting user's name from session.
     */
    socket.on('join', function () {
        var reply = {action: 'control', user: session.user, msg: ' joined the channel' };
        chatExchange.publish('', reply);
    });


   /**
     * Initialize subscriber queue.
     * 1. First create a queue w/o any name. This forces RabbitMQ to create new queue for every socket.io connection w/ a new random queue name.
     * 2. Then bind the queue to chatExchange  w/ "#" or "" 'Binding key' and listen to ALL messages
     * 3. Lastly, create a consumer (via .subscribe) that waits for messages from RabbitMQ. And when
     * a message comes, send it to the browser.
     *
     * Note: we are creating this w/in sessionSockets.on('connection'..) to create NEW queue for every connection
   */
    rabbitConn.queue('', {exclusive: true}, function (q) {
        //Bind to chatExchange w/ "#" or "" binding key to listen to all messages.
        q.bind('chatExchange', "");

   //Subscribe When a message comes, send it back to browser
        q.subscribe(function (message) {
            socket.emit('chat', JSON.stringify(message));
        });
    });
 });
Running / Testing it on Cloud Foundry
- Clone this app to
rabbitpubsubfolder cd rabbitpubsubnpm install& follow the below instructions to push the app to Cloud Foundry
[~/success/git/rabbitpubsub]
> vmc push rabbitpubsub
Instances> 4       <----- Run 4 instances of the server

1: node
2: other
Framework> node

1: node
2: node06
3: node08
4: other
Runtime> 3  <---- Choose Node.js 0.8v

1: 64M
2: 128M
3: 256M
4: 512M
Memory Limit> 64M

Creating rabbitpubsub... OK

1: rabbitpubsub.cloudfoundry.com
2: none
URL> rabbitpubsub.cloudfoundry.com  <--- URL of the app (choose something unique)

Updating rabbitpubsub... OK

Create services for application?> y

1: blob 0.51
2: mongodb 2.0
3: mysql 5.1
4: postgresql 9.0
5: rabbitmq 2.4
6: redis 2.6
7: redis 2.4
8: redis 2.2
What kind?> 5 <----- Select & Add RabbitMQ 2.4v service (for pub-sub)

Name?> rabbit-e1223 <-- This is just a random name for RabbitMQ service

Creating service rabbit-e1223... OK
Binding rabbit-e1223 to rabbitpubsub... OK

Create another service?> y

1: blob 0.51
2: mongodb 2.0
3: mysql 5.1
4: postgresql 9.0
5: rabbitmq 2.4
6: redis 2.6
7: redis 2.4
8: redis 2.2
What kind?> 6 <----- Select & Add Redis 2.6v service (for session store)

Name?> redis-e9771 <-- This is just a random name for Redis service

Creating service redis-e9771... OK
Binding redis-e9771 to rabbitpubsub... OK

Bind other services to application?> n

Save configuration?> n

Uploading rabbitpubsub... OK
Starting rabbitpubsub... OK
Checking rabbitpubsub... OK
- Once the server is up, open up multiple browsers and go to
<servername>.cloudfoundry.com - Start chatting.
Tests
Test 1
- While chatting, refresh the browser.
- You should automatically be logged in.
Test 2
- Open up JS debugger (On Chrome, do
cmd + alt +j) - Restart the server by doing
vmc restart <appname> - Once the server restarts, Socket.io should automatically reconnect
- You should be able to chat after the reconnection.
That’s it for now. Hopefully this blog helps you get started with using RabbitMQ. Look forward for more Node.js and RabbitMQ related blogs. The content of this blog has also been covered in a video. Feel free to get in touch with us for questions on the material.
General Notes
- Get the code right away – Github location: https://github.com/rajaraodv/rabbitpubsub.
- Deploy right away – if you don’t already have a Cloud Foundry account, sign up for it here.
- Check out Cloud Foundry getting started here and install the
vmcRuby command line tool to push apps. - To install the latest alpha or beta
vmctool run:sudo gem install vmc --pre.

![Stark & Wayne’s Dr. Nic on Winning in Production [Video]](https://www.cloudfoundry.org/wp-content/uploads/2017/01/cloud-foundry-blog-image-300x167.gif)