Translator’s note: This is the 9th article of the series “Cloud Foundry 100-day Challenge selection”. “#037” in the title means that it is 37th (published on July 27, 2015) in the original Japanese series.
Original Author: Isoo UENO
The 37th topic of “Cloud Foundry 100-Day Challenge” is OpenDocMan, a document management application made in PHP.
Basic Information
- Official site
http://www.opendocman.com/ - Source code
https://github.com/opendocman/opendocman - Reference
Simple document manager in PHP (Translator’s note: in Japanese)
Introduction
Today’s outline is as follows:
- Confirmation of Procedures and Retrieving Source Code
- Creating MySQL Database
- Registering (and Editing) Data Using SQL Buddy
- Creating
config.php - Completing Other Preparations before Deployment
- Deploying to Cloud Foundry
- Verifying Application Behavior
- Conclusion
1. Confirmation of Procedures and Retrieving Source Code
The deployment will be based on these procedures.
Regarding the Requirements, we will let the Cloud Foundry environment handle it, at this point of time. So let’s go ahead to see the 5 Minute Install. It is as follows:
- Download and unzip the OpenDocMan package, if you haven’t already.
- Create a database for OpenDocMan on your web server, as well as a MySQL user who has all privileges for accessing and modifying it.
- Create a folder outside of your public html folder that will contain your data files. This will be your “dataDir” folder in the config. For example,
mkdir /home/joeuser/document_repository/- Make sure the permissions and ownership of the data folder will allow for the web server to write to it. For example,
chgrp apache /home/joeuser/document_repository/; chmod 770 /home/joeuser/document_repository- You may also need to edit your apache settings to get the permissions working. The installation script has some examples that you will be presented with.
- Place the OpenDocMan software files in the desired location on your web server:
- If you want to integrate OpenDocMan into the root of your domain (e.g. http://example.com/), move or upload all contents of the unzipped OpenDocman directory (but excluding the directory itself) into the root directory of your web server.
- If you want to have your OpenDocMan installation in its own subdirectory on your web site (e.g. http://example.com/docs/), rename the directory opendocman-x.x to the name you’d like the subdirectory to have and move or upload it to your web server. For example if you want the OpenDocMan installation in a subdirectory called “docs”, you should rename the directory called “opendocman-x.x” to “docs” and upload it to the root directory of your web server.
- Make sure there is a templates_c folder ( ex. “mkdir templates_c” ), and the templates_c folder is writeable (ex. “chmod 775 templates_c” )
- Run the OpenDocMan installation script by accessing the opendocman folder URL in a web browser.
- Fill out the necessary form fields during the installer
- When you get to the last page, you click on the “New installation ..” link for a fresh installation
Regarding #5 of setting up Web server, we shall leave it to Cloud Foundry environment.
Regarding #6, we will consider employing the standard procedure, that is, pushing directly to Cloud Foundry from the root directory of the application.
By the way, first things first; let’s retrieve the source code and look into the contents.
~$ wget http://sourceforge.net/projects/opendocman/files/opendocman/1.3.2/opendocman-1.3.2.tar.gz
~$ tar xzvf opendocman-1.3.2.tar.gz
~$ cd opendocman-1.3.2/
~/opendocman-1.3.2$ ls
AccessLog_class.php  classHeaders.php        Department_class.php  file_ops.php         includes         odm-header.php    reports             udf_help.html
access_log.php       class.tree              department.php        FileTypes_class.php  index.php        odm-init.php      Reviewer_class.php  udf.php
add.php              config-sample.php       Dept_Perms_class.php  filetypes.php        in.php           odm-load.php      search.php          User_class.php
admin.php            CONTRIBUTING.md         details.php           forgot_password.php  install          out.php           Settings_class.php  UserPermission_class.php
ajax_udf.php         COPYING                 docs                  FormCheck.js         ldap.inc         Plugin_class.php  settings.php        User_Perms_class.php
Category_class.php   CREDITS.txt             edit.php              functions.js         LICENSE.txt      plug-ins          signup.php          user.php
category.php         crumb.php               Email_class.php       functions.php        linkcontrol.css  profile.php       templates           version.php
check_exp.php        databaseData_class.php  error.php             help.html            logout.php       README            templates_c         view_file.php
check-in.php         database.sql            File_class.php        history.php          magic            README.md         toBePublished.php   view.php
check-out.php        delete.php              FileData_class.php    images               mimetypes.php    rejects.php       udf_functions.php
When we open index.php, we find the following.
~/opendocman-1.3.2$ cat index.php

:

if(!file_exists('config.php'))
{
    if (
        !extension_loaded('pdo')
        || !extension_loaded('pdo_mysql')
    ) {
        echo "<p>PHP pdo Extensions not loaded. <a href='./'>try again</a>.</p>";
        exit;
    }
    // A config file doesn't exist
    ?>
    <html><head><link rel="stylesheet" href="templates/common/css/install.css" type="text/css" /></head>
        <body>Looks like this is a new installation because we did not find a config.php file. We need to create a config.php file now: <p><a href="install/setup-config.php" class="button">Create a Configuration File</a></p></body>
    </html>
    <?php
    exit;
}

:
Apparently, the config.php referred to in the above source file is normally created in the steps #7-#9 of the above procedures.
This time we will create config.php in advance, in order to enable using the application as soon as the deployment is complete.
Additionally, we will either remove or rename the install directory in order to prevent the later execution of any initial configuration scripts that are unnecessary.
Also in the above, you see that it requires to load the PHP extension modules pdo and pdo_mysql, so let’s complete their settings prior to the deployment.
database.sql is an SQL script, and it seems necessary to execute it for registering data into the application’s database.
There are several methods for the initial data registration to a database. In this post we’ll choose SQL Buddy.
The permissions for the templates_c directory found in the above procedures look fine as it is.
Now, taking into account all of the above, let’s reorganize the procedures of deployment to Cloud Foundry:
(Procedures to Deploy to Cloud Foundry)
- Retrieving source code (done)
- Creating MySQL database
- Registering (and editing) data using SQL Buddy
- Creating
config.php - Removing (renaming)
installdirectory - Creating a folder to store data files and configure access rights
- Configuring PHP extension modules
- Deploying to Cloud Foundry
2. Creating MySQL Database
Let us proceed from #2 of the above procedures.
We push the application with --no-start, create a MySQL service, and bind the application with the service. These are usual operations.
~/opendocman-1.3.2$ cf push opendocman --no-start
~/opendocman-1.3.2$ cf create-service p-mysql 100mb odm-msql
~/opendocman-1.3.2$ cf bind-service opendocman odm-msql
3. Registering (and Editing) Data Using SQL Buddy
In order to operate the database bound to the application in the previous section, we will deploy SQL Buddy as a separate application.
Please refer to the 17th article as it explains the details of its deployment procedures. However, this time there’s no need to bind SQL Buddy and MySQL service for our purposes.
After the SQL Buddy has been deployed, we can use it to operate the previously created MySQL database. But in order to do so, we need credentials information such as “Host”, “Username”, and “Password”.
To obtain this information, we will look into the environment variables of the application “opendocman”.
~/opendocman-1.3.2$ cf env opendocman
Getting env variables for app opendocman in org ueno / space test1 as ueno...

:

System-Provided:
{
 "VCAP_SERVICES": {
  "p-mysql": [
   {
    "credentials": {
     "hostname": "10.244.7.6",
     "jdbcUrl": "jdbc:mysql://10.244.7.6:3306/cf_d044277f_8a28_49ce_b13e_271929e7af23?user=OoCb8001U9wpFegv\u0026password=Cn6Wl14YTlpFQk6Z",
     "name": "cf_d044277f_8a28_49ce_b13e_271929e7af23",
     "password": "Cn6Wl14YTlpFQk6Z",
     "port": 3306,
     "uri": "mysql://OoCb8001U9wpFegv:[email protected]:3306/cf_d044277f_8a28_49ce_b13e_271929e7af23?reconnect=true",
     "username": "OoCb8001U9wpFegv"
    },
    "label": "p-mysql",
    "name": "odm-msql",
    "plan": "100mb",
    "tags": [
     "mysql"
    ]
   }
  ]
 }
}

:
Now let’s login to the SQL Buddy using the "hostname", "username", and "password" above.
In order to run database.sql against the database, we should load it to the SQL Buddy at first. So we should copy database.sql to the place where our Web browser is running in order to upload the file to the SQL Buddy.
After logging in, let’s find and click the particular database name (the value of the above "name") that should be in the left side of the initial screen.
Then click the Import link on the upper side of the screen, click select file, and load database.sql.
By clicking Submit, the script will run, creating each table in the database and registering data.
After the execution, the screen of the database should look like this:

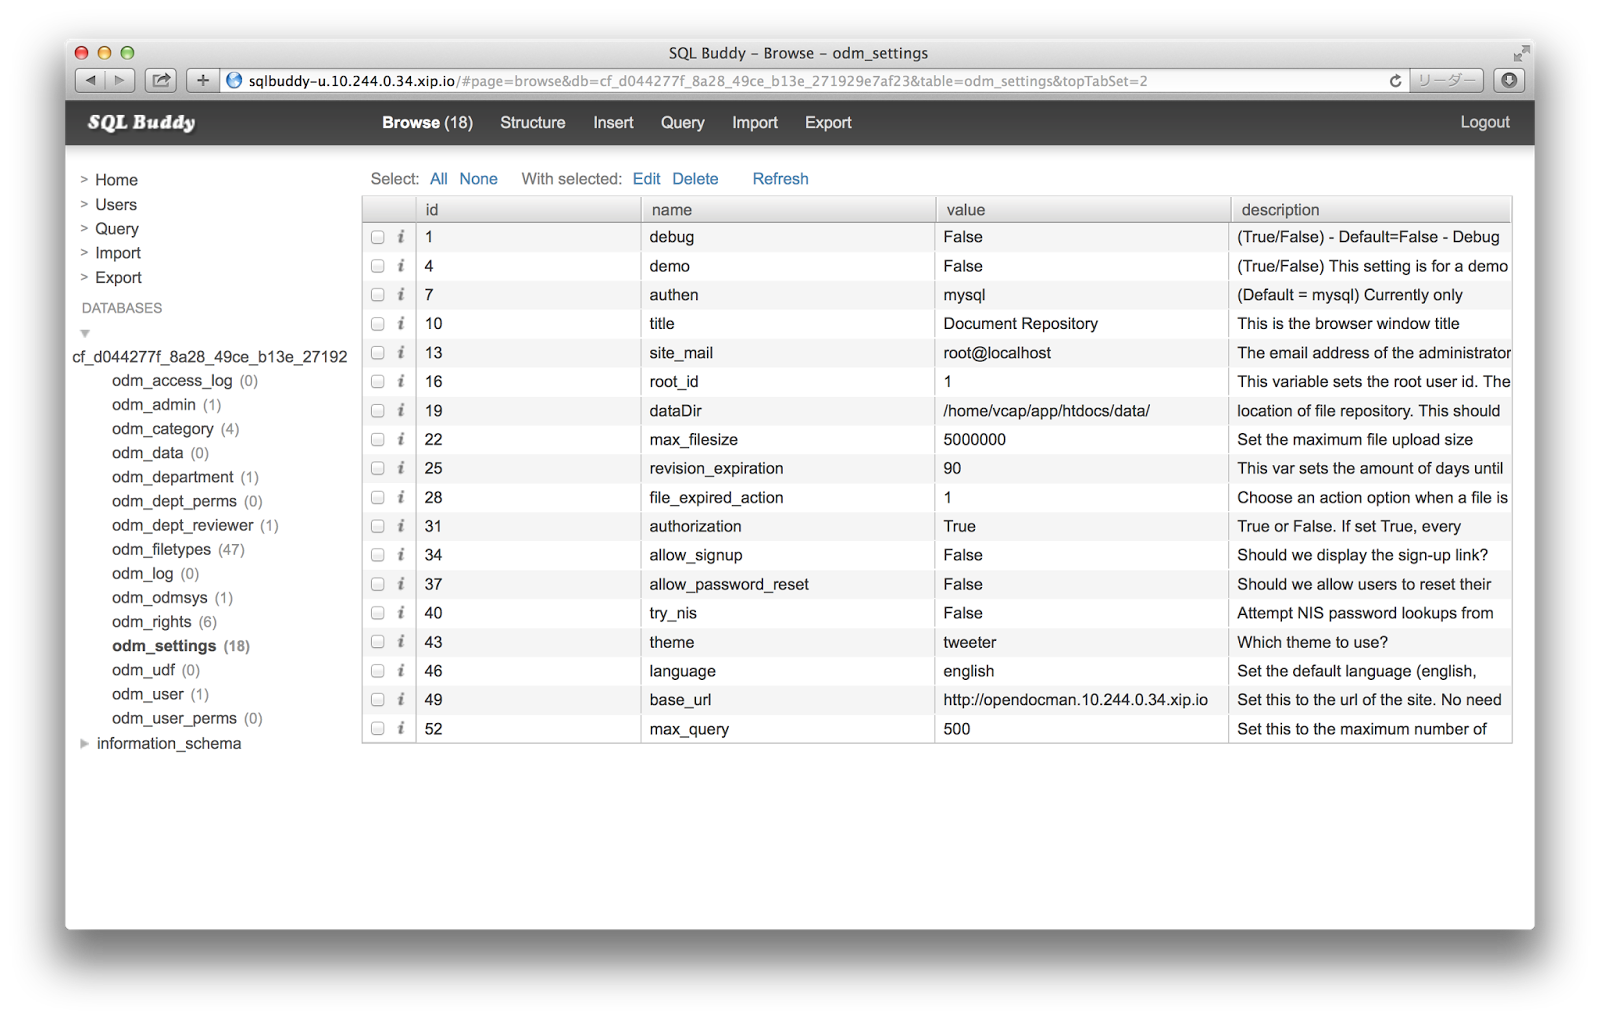
Subsequently, we’ll modify some registered data that are necessary to start the application, on this SQL Buddy.
Let’s click the right arrow close to the right side of odm_settings in the table shown in the above screen.
Then, the following screen appears.

Among the items list shown in the above screen, dataDir and base_url are what we need to modify to fit our environment in this post.
Let’s register /home/vcap/app/htdocs/data and http://opendocman.10.244.0.34.xip.io, respectively, and get the following:

4. Creating config.php
The next step is to create config.php.
There is the ready-made file config-sample.php, so we can simply copy and edit it.
~/opendocman-1.3.2$ cp -p config-sample.php config.php
Let’s make the following modifications to the database settings of this file in order to dynamically connect database by obtaining the connection information from the VCAP_SERVICES environment variable.
~/opendocman-1.3.2$ vi config.php
~/opendocman-1.3.2$ diff config-sample.php config.php
20a21,24
> $vcap = getenv("VCAP_SERVICES");
> $vcap_json = json_decode($vcap,true);
> $mysql_config = $vcap_json["p-mysql"][0]["credentials"];
>
30c34
< define('DB_NAME', 'database_name_here');
---
> define('DB_NAME', $mysql_config["name"]);
33c37
< define('DB_USER', 'username_here');
---
> define('DB_USER', $mysql_config["username"]);
36c40
< define('DB_PASS', 'password_here');
---
> define('DB_PASS', $mysql_config["password"]);
41c45
< define('DB_HOST', 'localhost');
---
> define('DB_HOST', $mysql_config["hostname"]);
5. Completing Other Preparations before Deployment
Before the deployment, let’s take care of the remaining necessary steps #5-#7.
First, rename the install directory in order not to be used when accessing the application.
~/opendocman-1.3.2$ mv install install.org
Next, create a data folder data, and chmod it according to the procedure.
~/opendocman-1.3.2$ mkdir data
~/opendocman-1.3.2$ ls -ld data
drwxrwxr-x 2 ueno ueno 4096 Jul 23 11:52 data
~/opendocman-1.3.2$ chmod 770 data
~/opendocman-1.3.2$ ls -ld data
drwxrwx--- 2 ueno ueno 4096 Jul 23 11:52 data
In fact, this folder is still not ready.
Since it contains nothing, it will be deleted when pushing to Cloud Foundry.
So, let’s create and place a dummy file inside the folder.
~/opendocman-1.3.2$ touch data/.keep
The last step is to configure PHP extension modules so that pdo and pdo_mysql will be loaded.
The PHP extension modules configurations should be familiar to you by now as we’ve seen them several times in past articles; Please refer to the 33rd article (Translator’s note: in Japanese) for a recent example.
~/opendocman-1.3.2$ mkdir .bp-config
~/opendocman-1.3.2$ vi .bp-config/options.json
~/opendocman-1.3.2$ cat .bp-config/options.json
{
        "PHP_EXTENSIONS": ["pdo", "pdo_mysql"]
}
6. Deploying to Cloud Foundry
Now, the preparations are complete. Push it again to deploy the application.
~/opendocman-1.3.2$ cf push opendocman
Updating app opendocman in org ueno / space test1 as ueno...

:

requested state: started
instances: 1/1
usage: 256M x 1 instances
urls: opendocman.10.244.0.34.xip.io
last uploaded: Thu Jul 23 04:44:39 UTC 2015
stack: cflinuxfs2
buildpack: PHP

     state     since                    cpu    memory          disk      details
#0   running   2015-07-23 01:45:00 PM   1.6%   30.1M of 256M   0 of 1G
The deployment has been successful, and finally the application has been started!
7. Verifying Application Behavior
Lets’ access http://opendocman.10.244.0.34.xip.io.

Login as “admin”.

Let’s follow the “Admin” link up top, create an ordinary user “taro”, and logout once.
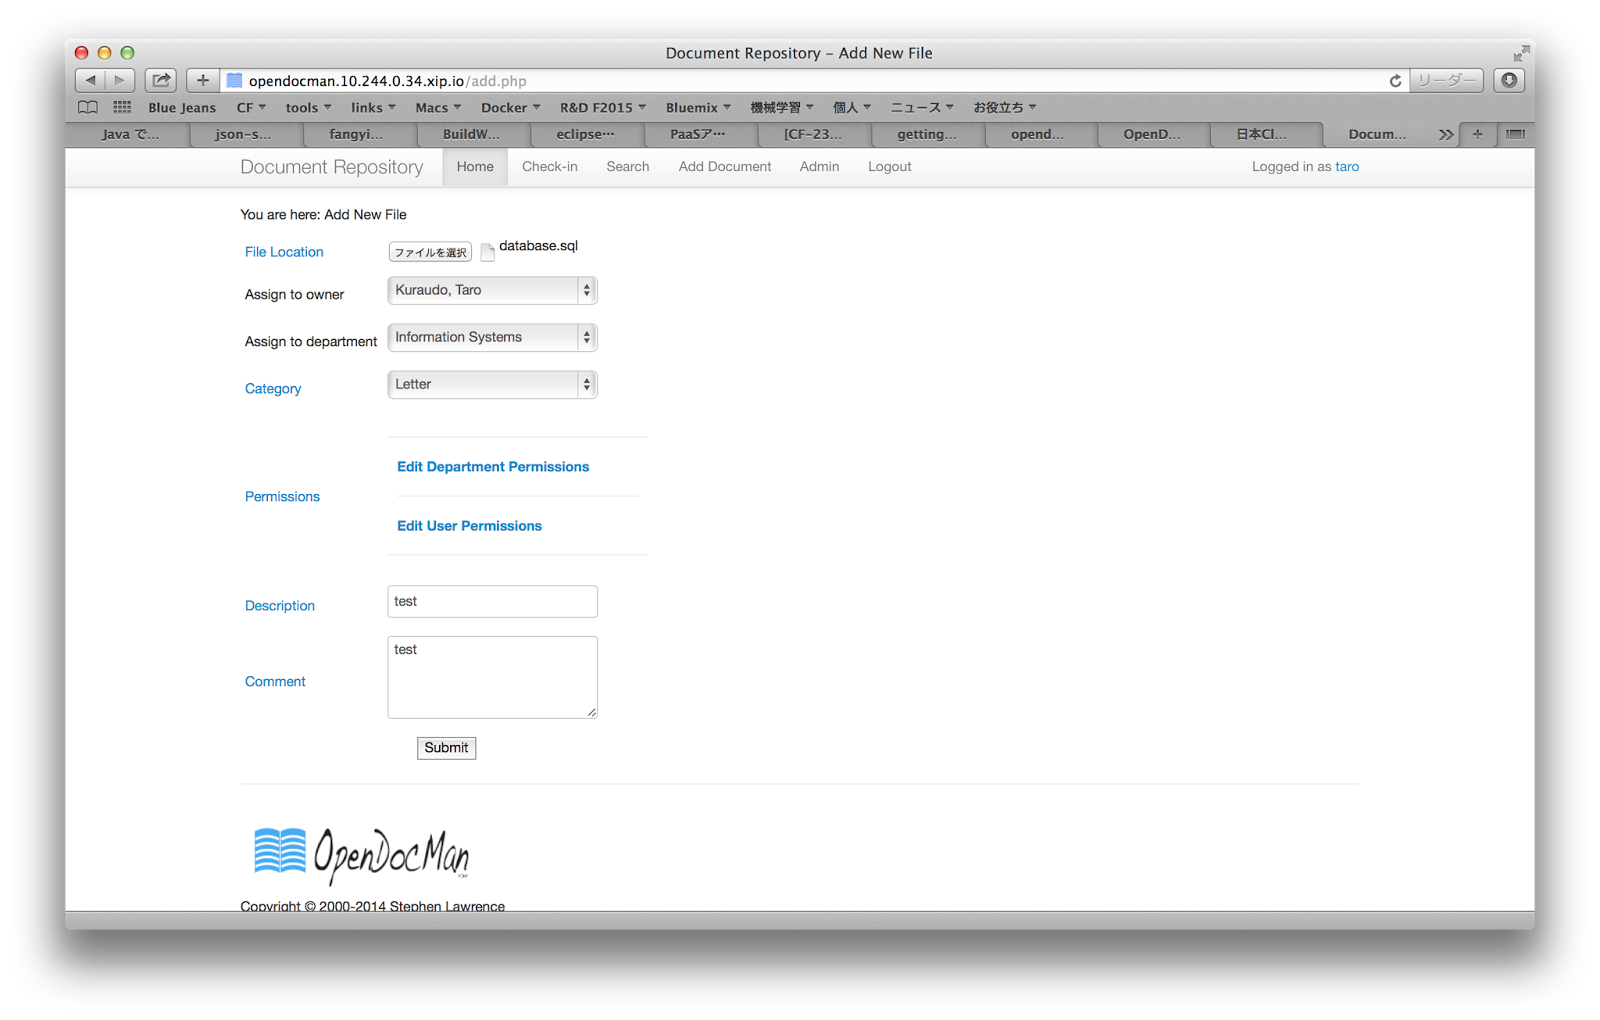
Next, let’s login as “taro”, and try to upload a local file using this application.
Select an arbitrary file, fill out the form,

.. then click Submit,

.. and a message appears signifying file addition completion.
If we go back to Home and take a look at the list of the added files,

.. we are able to see that the added file are properly stored.
8. Conclusion
The deployment procedures of this application is characterized by the amount of preparatory work before the deployment.
They can be largely divided into the following three types of operations:
(1) Creating database and registering data
(2) Configuring database connection
(3) Environment configuration, such as creating folders and working on PHP extension modules
We’ve often seen “(2) Configuring database connection” in past articles. This time we also implemented a dynamic database connection by reading information from the VCAP_SERVICES environment variable.
That is a basic technique for cloud native application development to enable adapting and scaling dynamically with changing environments where the application is operated. (Please refer to Twelve-Factor App about methodologies of cloud native application development.)
Software Used in This Post
- cf-release (v211)
https://github.com/cloudfoundry/cf-release/tree/v211
( https://github.com/cloudfoundry/cf-release/tree/2121dc6405e0f036efa4dba963f7f49b07e76ffa ) - bosh-lite
https://github.com/cloudfoundry/bosh-lite/tree/552dc6869600c5350eb7ffb4fb9c9c5e79e3889d - CF CLI (v6.12.0-8c65bbd-2015-06-30T00:10:31+00:00)
https://github.com/cloudfoundry/cli/tree/v6.12.0 - cf-mysql-release (v20)
https://github.com/cloudfoundry/cf-mysql-release/tree/v20 - OpenDocMan v1.3.2
http://sourceforge.net/projects/opendocman/files/opendocman/1.3.2/opendocman-1.3.2.tar.gz


