
This post was co-authored by Mirah Gary & George Blue, Senior Software Developers with VMware R&D
What is BOSH?
BOSH is a tool for deploying software, packaged as BOSH releases, to VMs (virtual machines) in the cloud. BOSH will also monitor the software and recover from failures. Cloud Foundry relies on BOSH for deploying infrastructure.
The goal of this guide
In this tutorial we show you how to create the simplest possible BOSH release, and then we build on it to illustrate a few more sophisticated features.
You can run this tutorial on BOSH or BOSH Lite, which we assume you already have up, running and targeted.
“Hello world!” BOSH release
Use the BOSH command line to initialize a release:
bosh init-release --dir hello-world-release --git
This will create a directory called hello-world-release. Take a look at the files inside it. Note that it is also a Git repository.
Our “Hello world!” release needs a BOSH job. The BOSH command line can generate a job skeleton for you:
Inside the release directory, run the comand
bosh generate-job hello-world
This will create a directory called jobs/hello-world for you. Take a look at the files inside.
Create a file called jobs/hello-world/templates/run.sh
#!/usr/bin/env bash

echo "Hello world!"
Edit the job spec file jobs/hello-world/spec to tell BOSH about the script. Change the templates stanza to stay:
templates:
  run.sh: bin/run
A BOSH job with bin/run is called an errand.
To test our work, we can create and upload a dev release:
bosh create-release --force
Without the --force flag, BOSH will warn us that we have not committed our changes. We want to test our work before we commit it.
bosh upload-release
In order to use the release, we need to add it to a BOSH deployment. We did this on GCP, but with minor modifications it will work on any other IaaS.
First we need to upload a stemcell, which our release will be installed on:
bosh upload-stemcell https://bosh.io/d/stemcells/bosh-google-kvm-ubuntu-trusty-go_agent
Then we create a manifest.yml to describe the deployment. Here’s an example of the one that we used:
name: hello-world-deployment

releases:
- name: hello-world
  version: latest

stemcells:
- alias: default
  os: ubuntu-trusty
  version: latest

update:
  canaries: 1
  max_in_flight: 1
  canary_watch_time: 1000-30000
  update_watch_time: 1000-30000

instance_groups:
- name: server
  azs: [z1]
  instances: 1
  vm_type: default
  stemcell: default
  networks:
  - name: default
  jobs:
  - name: hello-world
    templates:
    - name: hello-world
      release: hello-world
Deploy the release with the deployment manifest
bosh -d hello-world-deployment deploy manifest.yml
We can see the errand job that we created with the comand:
bosh -d hello-world-deployment errands
You should see an errand called hello-world, which we can run with the command:
bosh -d hello-world-deployment run-errand hello-world
You should see the text “Hello world!” as standard out (stdout) from the errand.
Congratulations! You’ve created a “Hello world!” BOSH release. Feel free to commit your work.
Adding a package
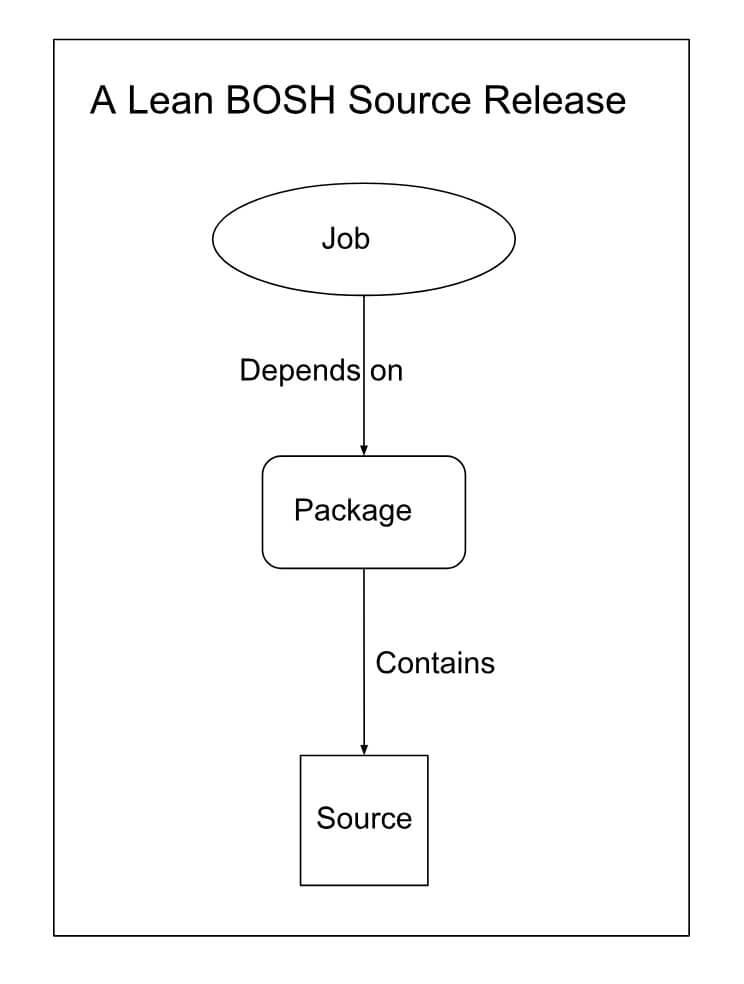 Let’s add a software package to our BOSH release to make it more useful. We are going to use Redis because it’s simple to get working and can illustrate various BOSH concepts.
We need a new BOSH release and job, so let’s run the commands that we know and love:
bosh init-release --dir redis-release --git
cd redis-release
bosh generate-job redis
Let’s download Redis and put it in the src directory:
curl http://download.redis.io/releases/redis-4.0.9.tar.gz | tar zx -C src -
There should now be a directory called src/redis-4.0.9. You’ll see that it’s C source code with a Makefile.
Note that v4.0.9 was the latest stable version when this was written, but the stable version will change over time. Feel free to use a later version, though you may have to make adjustments.
Now we need to tell BOSH how to package up the Redis code. We do that with a BOSH package. BOSH can create a skeleton for us:
bosh generate-package redis
This will create a directory called packages/redis containing spec and packaging files.
The package spec file tells BOSH where to find your package. BOSH will look first in src. Edit the spec to let BOSH know where to find Redis
---
name: redis

files:
- redis-4.0.9/**
The packaging file tells BOSH how to build your source. For Redis, change the packaging script to be:
set -ex

pushd redis-4.0.9
  make
  make PREFIX=${BOSH_INSTALL_TARGET} install
popd
Now the job needs to know how to run Redis. The Redis server should run as a background task (daemonized), so we will configure it to do that with a jobs/redis/templates/redis.conf Redis configuration file:
daemonize yes
logfile /var/vcap/sys/log/redis/redis.log
pidfile /var/vcap/sys/run/redis/pid
We also need a script to start and stop the Redis server. The file should be named jobs/redis/templates/ctl.sh. Here’s the one that we used:
#!/usr/bin/env bash

RUN_DIR=/var/vcap/sys/run/redis # PID file goes here
LOG_DIR=/var/vcap/sys/log/redis

case $1 in

  start)
    mkdir -p $RUN_DIR $LOG_DIR
    chown -R vcap:vcap $RUN_DIR $LOG_DIR

    /var/vcap/packages/redis/bin/redis-server \
    /var/vcap/jobs/redis/redis.conf \
    1>> $LOG_DIR/redis.out \
    2>> $LOG_DIR/redis.err

    ;;

  stop)
    /var/vcap/packages/redis/bin/redis-cli shutdown

    ;;

  *)
    echo "Usage: ctl {start|stop}" ;;

esac
Edit the job spec file jobs/redis/spec to tell BOSH about the Redis script and configuration. Change the templates and packages stanzas to say:
templates:
  ctl.sh: bin/ctl
  redis.conf: redis.conf

packages:
- redis
BOSH uses Monit to manage running processes. We need to tell Monit how to start, stop and monitor Redis. We do this by changing the file jobs/redis/monit to:
check process redis
  with pidfile /var/vcap/sys/run/redis/pid
  start program "/var/vcap/jobs/redis/bin/ctl start"
  stop program "/var/vcap/jobs/redis/bin/ctl stop"
  group vcap
See how Monit will use the script ctl to start and stop Redis, and will monitor the health of Redis by reading the process ID from /var/vcap/sys/run/redis/pid file and checking that the process is still running. The Redis configuration file tells Redis to create this file.
As before, we need to create and upload the release:
bosh create-release --force
bosh upload-release
And as before, we need a BOSH manifest to describe the deployment. The only differences from the “Hello world!” manifest are the names:
name: redis-deployment

releases:
- name: redis
  version: latest

stemcells:
- alias: default
  os: ubuntu-trusty
  version: latest

update:
  canaries: 1
  max_in_flight: 1
  canary_watch_time: 1000-30000
  update_watch_time: 1000-30000

instance_groups:
- name: redis-server
  azs: [z1]
  instances: 1
  vm_type: default
  stemcell: default
  networks:
  - name: default
  jobs:
  - name: redis
    templates:
    - name: redis
      release: redis
Deploy the release with the deployment manifest:
bosh -d redis-deployment deploy manifest.yml
Check that the Redis is running with the command:
bosh -d redis-deployment instances
Congratulations! You now have a Redis server running on BOSH.
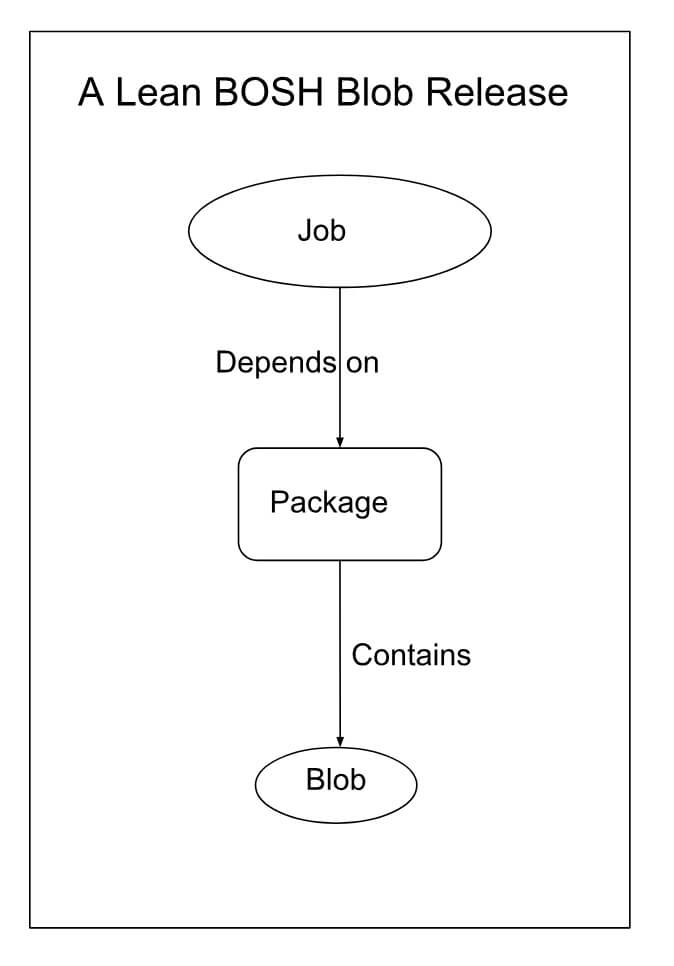
Adding a Blob
 Rather than checking in over 500 files of Redis source code, how about a more sophisticated way to manage the Redis code? BOSH allows us to store the Redis download in a Blobstore, so we don’t have to add it to the Git repository for the release. Let’s start by cleaning up the
 src directory:
rm -r src/redis-4.0.9
Download Redis again and tell BOSH to register it as a blog:
curl -o /tmp/redis-4.0.9.tar.gz http://download.redis.io/releases/redis-4.0.9.tar.gz
bosh add-blob /tmp/redis-4.0.9.tar.gz redis-4.0.9.tar.gz
See that BOSH has created a blobs directory containing a file called redis-4.0.9.tar.gz.
Nowe we need to update the packages/redis/packaging script to extract the source from the blob:
set -ex

tar xzf redis-4.0.9.tar.gz
pushd redis-4.0.9
  make
  make PREFIX=${BOSH_INSTALL_TARGET} install
popd
and also the packages/redis/spec file:
---
name: redis
files:
- redis-4.0.9.tar.gz
As before, we need to create, upload, and deploy the release:
bosh create-release --force
bosh upload-release
bosh -d redis-deployment deploy manifest.yml
Congratulations! You now have a BOSH deployment that has built Redis by extracting the source from a blob. Now would be a good time to commit your work.
Creating a Final Release
So far we have been creating a dev release. To create a final release (one that you could publish), we first need to configure a blobstore. The simplest kind is a local blobstore, which can be configured by changing config/final.yml to:
---
blobstore:
  provider: local
  options:
    blobstore_path: /tmp/redis-blobs
final_name: redis
To create the final release, run:
bosh create-release --final
Once this command has completed, you will be able to see the new files in .final_builds and releases which record the checksums and other metadata associated with the release. These files should be committed.
Test the final release by deploying it:
bosh upload-release
bosh -d redis-deployment deploy manifest.yml
Congratulations! You have created a BOSH final release.