

To be honest, I was considering for a long time whether I should write this post. I’m sure this topic might be helpful to many Cloud Foundry developers, but it could also tempt them to do very bad things. Then I thought of my favorite Spiderman quote and decided to write this post.

With great power, comes great responsibility!
So, what are we even talking about? When I was coding cloud-native apps or preparing demos, I often noticed that I cannot test everything on my local machine. For example, I often use components which interact with backing services or other cloud apps. It’s not always easy to test and develop these components locally under realistic conditions, as the local environment behaves differently.
There have been different efforts by several community members to close the gap between the local and Cloud Foundry runtime environment. My colleague Maximilian Streifeneder wrote a great blog post about connecting a local debugger client to a running app in Cloud Foundry. This is the first step in identifying the differences of both runtimes. And Victor Ionescu put the cherry on top of that idea and created an entire Docker Compose landscape to emulate the behavior of the cloud runtime anywhere.
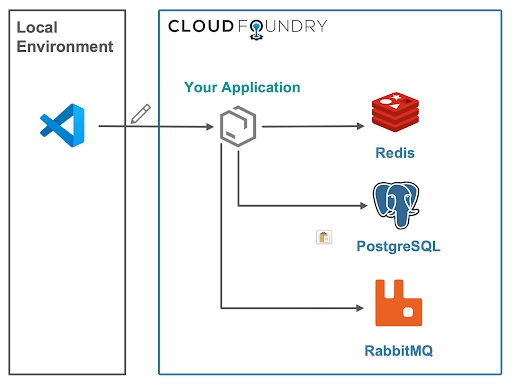
In this post, we won’t simulate the cloud environment, but control the running app directly: We will connect a local editor to the deployed cloud app! This allows us to read and update the application code live in the cloud. Small modifications and tests can then be done without the tedious process of packaging and updating the application with all its microservices. You probably understand now why this can cause severe damage when used in production. Please read the following statements aloud to take this in:
I won’t use this in production
I won’t use this in production
I won’t use this in production
Updating the configuration of a running approuter
I’m currently working on a small application for SAP’s TechEd 2019 which will combine the Cloud Application Programming Model with Azure cloud services. For this, I’m writing an application that contains a reverse proxy app. To be honest, errors related to the routing configuration files happen quite often to me. In the planned app, this file looks fairly simple and only contains a couple of lines of code. However, I often (really often) manage to get a small error in there. Sometimes I have a typo in the property name; sometimes I choose an invalid value. No matter what the error is, it typically takes about five seconds to fix the issue and another five minutes until the app is pushed, staged and started.

The normal approach: Editing the files locally and deploying them to Cloud Foundry
Let’s have a look at how we can change the configuration files while the application is already running. Btw: This approach also works for any other file modification and can be used for UI as well as backend services.
To do this, we will use the VS Code remote development extension which is still in Preview mode. The plugin will connect to the application container via SSH. For this connection, we will leverage the one-time password feature of the Cloud Foundry CLI. I consider this approach cutting edge, so please be prepared for some “speed bumps” along the road.
The dangerous approach: Editing the files directly on Cloud Foundry
Hands-on
For this hands-on approach, you need a couple of things. Obviously, access to a Cloud Foundry space, with enabled ssh, is mandatory (you can get a free one at SAP Cloud Platform). Furthermore, you need to have the Cloud Foundry CLI and Microsoft’s VS Code installed. And last but not least, you need the application you want to modify.
For testing purposes, you could use this sample application and add the following snippet after line 24. This will create a broken HTTP endpoint (it will break because the generated random number is not a valid HTTP status code).
app.get('/random', function ( req, res) {
 res.send(Math.random());
});
Now that all tools are installed, it’s time to get our hands dirty:
-
- Install the VS Code extension for remote development
- When we later connect VS Code to the running application, the plugin will install some additional tools in a directory called .vscode-server in the running container. Make sure your application has at least 100 MB of free disk space. You can see the consumed and total disk space when running.
cf app cf-nodejs - Once the application is started, all its source code will be in-memory. The VS Code extension won’t allow us to modify the memory inside of Cloud Foundry. What we can do is edit the files on disk. After the modification, we need to make sure that Cloud Foundry reloads the code and restarts automatically. For this purpose, use nodemon and replace the start script of the application.
"start": "nodemon server.js"Don’t forget to add nodemon as a dependency:
"nodemon": "^1.19.1"
- Now we can deploy our application as usual. Our sample app can be deployed with the following command (executed from the project root).
cf pushSame as for “normal” debugging, you’ll need to enable SSH for your application. The second line enables SSH for your entire space. Lastly, you need to restage your application so that the changes come into play.
cf enable-ssh cf-nodejs cf allow-space-ssh <space-name> cf restage cf-nodejs - Now it’s time to collect connection information which is needed to establish the SSH connection. This includes the GUID of the running application and the SSH endpoint.
cf app cf-nodejs --guid cf curl v2/info #property "app_ssh_endpoint" - Open VS Code and the command palette and select the >Remote SSH: Open Configuration File option. Select the first file suggestions and add the following remote host. The user follows the pattern cf:<app-guid>/<instance-index> and the hostname and port can be copied over from the SSH endpoint. Please note, Cloud Foundry uses port 2222 for SSH over the default port 22.
Host AppOnCloudFoundry HostName ssh.<cf-endpoint> User cf:<app-guid>/0 Port 2222 - To establish the SSH connection, open the command palette one more time and chose the option >Remote-SSH: Connect Current Window to Host… Then, select the host we just created.You will be prompted for an SSH password. This is tricky as we’re never exposed to credentials in Cloud Foundry! The Cloud Foundry CLI offers you an option to create a one-time password. This key is only valid for one session. Unfortunately, the VS Code extension will prompt you several times for the password. I reported the issue here, you can reduce the number of prompts in the settings).Unix users can make their life a little bit easier by using the second command to pipe the password straight into the clipboard.
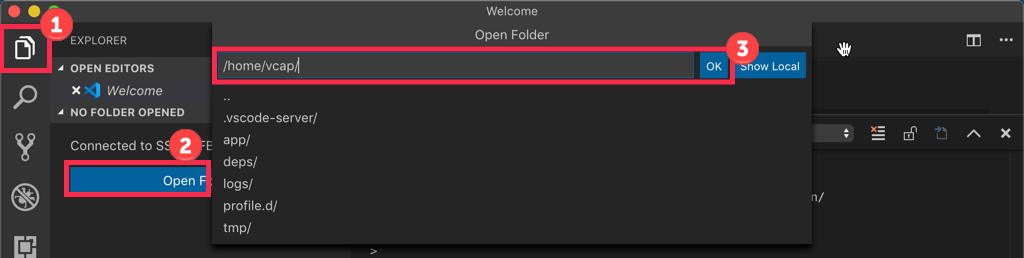
cf ssh-code #cf ssh-code | pbcopy - Open the file explorer (1) and click on the Open Folder button (2) and confirm the suggested /home/vcap/ path with OK (3). You will most likely be prompted a couple more times for new one-time passwords.
- You can now see an interface you’re familiar with. Edit the file vcap/app/server.js and fix the broken function:
app.get('/random', function ( req, res) {
res.send("Result:" + Math.random());
})
Nodemon will restart your app automatically.
Congrats, you fixed a running cloud application!
Pitfalls to consider
This experiment worked quite nicely for my use case of testing rapid changes of configuration files and application descriptors. There are a couple of things that should be in the back of your mind when you consider using this for your own work:
- THIS SHALL NOT BE USED IN PRODUCTION!
- The extension is still in the preview stage, which means things are expected to break.
- While the expose-no-credentials policy of Cloud Foundry is usually very useful, creating one-time passwords is a little bit annoying in this use case.
- The application GUID changes when a new container has been created. So, you need to update the ssh host file quite often.
- If you break something and save the file, the app will restart and crash right away. Cloud Foundry will notice this and replace the “broken” container with a new one =>The SSH session will be terminated and you’ll have to start over again.
Summary
In this post you have learned:
- How to enable the debug mode of Cloud Foundry apps
- About the remote development extension (Preview) of VS Code
- The VS Code extension will install additional libs next to your apps
- You can retrieve one-time SSH passwords from the Cloud Foundry CLI
- How to trigger a restart your apps after a file change event
- “With great power comes great responsibility”
This post was originally posted on the SAP Community and has been modified from its original form.